|
|
Post by lauren on Jul 25, 2008 11:17:01 GMT -5
Oops, sorry.
|
|
|
|
Post by dawnluckham on Jul 28, 2008 9:37:51 GMT -5
Tess, in answer to your question with comparison to the La Mode pattern and the Sense and Sensibility patterns:
I have both patterns.
I like the La Mode pattern very much. It’s beautifully presented. There are a HUGE number of pattern pieces in the package and I found the most useful way to manage this was to cut the pattern pieces apart and put all the pieces for the spencer jacket in a labeled zip loc bag and all the pieces for the petticoat in its own bag, and all the pieces for the individual bodices together, etc. I also don’t cut the pattern pieces to size, but I trace out the size I need on tracing paper so I then have the fully traced pattern for size 14 spencer, size 16 cross-over bodice, size 12 plain bodice, etc.
Instructions for this pattern are all in one book and you flip open to the garment you want to make and have step-by-step sewing instructions. There are some but not a lot of illustrations. If you are not confident with written instruction and you depend upon images you will find some spots where you’ll be puzzling for a bit. On the other hand the instructions are well written and the garments are not difficult to make.
The shape of the La Mode skirts and bodices make beautiful garments. I’m not a big fan of the sleeve pattern – but that’s specifically because I work within the 1812 – 1814 time frame. The sleeves for this pattern are too big and full for the period. I’d say they work well for 1815 and beyond. They do not work for the first decade of the 19th century. A ton of fullness needs to be drafted out of them, and for this period, I’d like to see them sit further into the back.
The “bib front” dress in the La Mode pattern is a “mock bib front” and it’s a back-buttoned gown. In my own humble opinion, why bother? The bib front is an amazing design worth recreating, but there’s no reason I can think of to put a fake bib on a back closing gown.
The Sense and Sensibility Elegant Lady’s Closet pattern has Jennie Chancey’s wonderful instructions, which makes construction easy. I love the drawstring dress in this pattern. I love the sleeve shapes. I skip the under flaps of the lining when making the drawstring dress and simply bag line or make the drawstring casing with bias tape. I found the under flaps difficult to deal with in the drawstring dress.
The cross-over dress; though I really want to like it, is not my favourite. I don’t like all that pleating and it’s difficult to “tame” the pleating so that the whole bodice doesn’t poof out and make the wearer feel ‘blousy’. I’ve made it 3 times now and I’m still trying to work it to a pattern shape that I like.
I like the skirt shapes in this pattern and I like the sleeve and back shapes very much.
You’d have to also own the Sense and Sensibility spencer pattern and the original dress pattern (or the Simplicity version of the S&S pattern) to have all the options that are offered in the La Mode pattern.
On the other hand, the La Mode pattern does not offer a stays or chemise pattern as the S&S patterns do.
For what it’s worth, there are my thoughts on comparison of the two.
|
|
|
|
Post by Mme de Beaufort on Jul 29, 2008 21:39:26 GMT -5
Mode Bagatelle's crossover front bodice with a round-gown and teensy sleeves. Made from inexpensive white muslin for Friday's Masquerade (for Tara who is very lean and it felt like I was making doll-clothes). 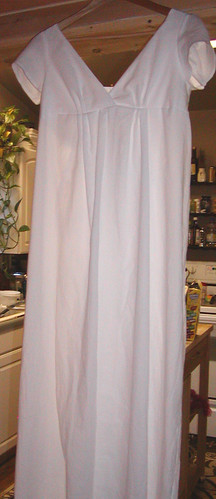 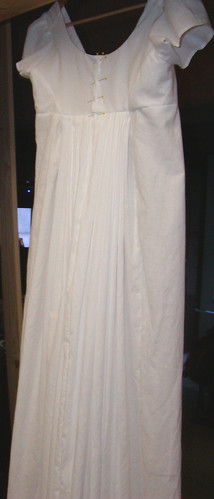 VERY simple to do (except the pleating took some patience and ten billion pins. |
|
|
|
Post by Mme de Beaufort on Jul 29, 2008 21:40:27 GMT -5
I wasn't moderating, Lauren, promise; I was just suggesting. Your reviews might be helpful and if they're easy to find for others that's a bonus.  |
|
|
|
Post by dawnluckham on Jul 30, 2008 9:44:12 GMT -5
Nice work, Steph! I love the white gown! I’ll bet it looks beautiful on her!
|
|
|
|
Post by Mme de Beaufort on Jul 30, 2008 12:21:50 GMT -5
Thanks, Dawn. It was a quick project, I dare say. Half-a Saturday, with lots of chitchat and gossip in between. It's fun to sew with friends nearby.
I'll get pictures of the garment with the owner in it on Friday so you can see its shape.
|
|
|
|
Post by lauren on Jul 30, 2008 19:17:15 GMT -5
Very pretty. Where did you find the fabric?
|
|
|
|
Post by Mme de Beaufort on Jul 31, 2008 17:55:53 GMT -5
Very pretty. Where did you find the fabric? Do you mean the white fabric for Tara's dress? It's $1.99 muslin from Joanne's Fabric. |
|
|
|
Post by lauren on Aug 1, 2008 12:04:25 GMT -5
And that's why I like Joann's. I just did my "time to restock on muslin" run on Wednesday. I got the same stuff, $1.99 yd :-)
|
|
tess
Clergy
 "...my gown is to be trimmed everywhere with white ribbon plaited somehow or other." - Jane Austen
Posts: 172
|
Post by tess on Aug 2, 2008 10:47:04 GMT -5
Wow. What a deal on the fabric!
Very nice Steph! Do you have any advice on pinning the pleats in the back. I just about lost my mind on my last dress and it didn't have anywhere near as many little pleats. I love that look and want my next to have more next time.
I can't wait to see the dress on!
|
|
|
|
Post by Mme de Beaufort on Aug 2, 2008 17:41:24 GMT -5
Lauren and Aaron captured a few fleeting glimpses of the fast-moving Pixie that is Tara (she's got the elaborate ivy-laden headdress and a purple ribbon 'round her waist). It fit her to a tee the second time 'round. I had to take the size 6 in to about a size 2, no joke. But it looked great on her.
I also made the blue dress my sister is wearing from the same pattern, but she's pretty much a standard size ten. She had a blast.
As for pleating.. Hmm....
The best way to put it is, after you've determined the front-center of your skirts, and pinned it in place, and gone all the way 'round both sides until you've reached the seam where the side meets the back, then you do the following:
Use 2-3 fingers per pleat in the beginning, your first pleat flush with the seam of the bodice side-back. Pin the edge of each pleat, using it to match up to the next. There's a lot of yardage pleated into that back, at least 2 maybe three... so I used wide pleats, closely stacked (some less than a quarter of an inch apart), and 'diminished' them as I got closer to the edge of the back closure (two fingers and then down to one). You pin every single pleat, and also pin the 'back' of the pleats to keep them in place for sewing. I can't explain it as well as I could show you.... Or perhaps even illustrate it.
I hope that helps.
|
|
tess
Clergy
"...my gown is to be trimmed everywhere with white ribbon plaited somehow or other." - Jane Austen
Posts: 172
|
Post by tess on Aug 3, 2008 16:45:10 GMT -5
That makes sense about folding the pleats. When you pin them, I'm assuming you pin horizontally across the pleats?
The pictures of the dress were lovely. You weren't kidding about Tara being fast moving...she was a blur in most of the pics!
|
|
|
|
Post by Mme de Beaufort on Aug 3, 2008 17:00:09 GMT -5
No, I pinned the pleats vertically along the pleat so I can sew over them... it looked like a little ladder of pins.
|
|
tess
Clergy
"...my gown is to be trimmed everywhere with white ribbon plaited somehow or other." - Jane Austen
Posts: 172
|
Post by tess on Aug 3, 2008 17:06:46 GMT -5
Oh, that helps. No wonder I had trouble keeping everything pleated as I was sewing! I really can't wait until I get enough experience not to make the stupid mistakes!!  |
|
|
|
Post by lizziebennet on Aug 3, 2008 22:02:02 GMT -5
Does one ever get enough experience that they stop making stupid mistakes? |
|
|
|
Post by dawnluckham on Aug 4, 2008 9:54:26 GMT -5
;D Nope! Not in my own experience. The seam ripper and I are good friends! ;D
|
|
|
|
Post by dawnluckham on Aug 4, 2008 10:09:27 GMT -5
About pleating: I have a slightly different method of working out the pleats. I find it challenging to over-lay pleats any more than double pleats so this is the method I’ve worked out: I mark the top edge of the skirts every 1-inch: Sometimes I make a tiny nick in the top edge of the fabric with scissors or sometimes I use a marking pen. For Regency period gowns, I often leave the front of the dresses flat (but you all know that already  ). So, deciding where to start the pleating at the sides often depends on the person wearing the gown and how “columnar” or “hippy” their figure is. With a curvy figure, I find there needs to be more pleating at the sides or the flat front panel pulls at the hip line. I start somewhere at the side to back and begin making 1 inch pleats facing the back (using my 1 inch markings). If I’ve got a lot of fabric in the skirt, I may start to make double pleats after the first 3 or 4 single pleats. As I come close to the centre back seams in the bodice, I stop the 1-inch pleats and I cartridge pleat the rest of the skirts. Cartridge pleating allows a great deal of fabric to fit into a very small space. This has always worked for me without having to mathematically calculate pleating measurements or fight with triple (or more) pleats lying on top of one another. I feel I have the best control of the fabric with this system. |
|
tess
Clergy
"...my gown is to be trimmed everywhere with white ribbon plaited somehow or other." - Jane Austen
Posts: 172
|
Post by tess on Aug 5, 2008 9:10:33 GMT -5
That makes sense. I like the flat front on the S&S dress I made, but wanted a fuller back. I found your picture of your red, striped dress with the cartridge pleating (very cute!). The change in pleating makes sense. I was trying to figure out,however, how to attach the cart. pleated section to the bodice waist. I found these instructions online: www.elizabethancostume.net/cartpleat/Does this sound right? I'm still a little confused about it, but I think I get the idea. Post Modified: I just found this tutorial on the Reconstructing History site. www.reconstructinghistory.com/beginners.php?s=&c=8&d=141&e=&f=&g=&a=143&w=2I think I've got it. I'm much better with photos than I am with drawings! |
|
|
|
Post by dawnluckham on Aug 5, 2008 19:33:47 GMT -5
That’s how to attach the Cartridge pleating if you want the pleats to “swing” free. In these cases the bodice bottom is finished and the pleats are hand attached at the fold to allow a free motion.
In Regency era gowns this isn’t necessary because the cartridge pleats don’t surround the whole body. They’re compressed into a very small area.
I usually line my bodices and then I attach the skirts to the fashion fabric of the bodice. I then bring the lining over the raw edges of that seam and I fold under the seam allowance in the lining and hand stitch the lining to the skirt/bodice seam hiding all raw edges inside.
This isn’t how it was generally done in period, but it’s my preferred method because it makes for a clean and tidy inside and I’m usually selling gowns to people who are used to their modern clothing insides being serged or bag lined and all seams are hidden or cleaned up with machine finishes. The idea of hand binding or hand overcastting all seams for a period correct and totally tidy finish lacks practicality for what I do. French seams are also period correct and I use French seaming whenever I have exposed seams unhidden by lining.
So back to how I do the Cartridge pleating: I use the gathering method exactly as your sites have shown – two or three parallel rows of ¼ inch stitches all matched up. I then draw up the stitching to create the pleats and pin the pleats to the bottom of the bodice fashion fabric and simply treat them as tiny pleats. I push them to fold toward centre back and first I baste (because it’s a LOT of fabric and you want to be sure it’s all lined up correctly and then I just sew the skirts to the bodice. I don’t bother with the hinging technique for the Cartridge pleats. They just get stitched down. Then I trim and grade the seam allowances to reduce bulk and, as I said before, I bring the lining over top of the raw edges and hand stitch it to enclose all unfinished edges.
|
|
|
|
Post by Mme de Beaufort on Nov 4, 2008 13:47:59 GMT -5
This time I used the mock-drop front and made it a real drop-front. We'll see how it fits Tara, I'm not sure yet. I had to max out the brightness/contrast to show some detail on these pics because the gown is jet black. I used the straight, half-sleeves. I made the gown part myself. I didn't bother to cut the skirts using the pattern, I just made a standard round-gown. 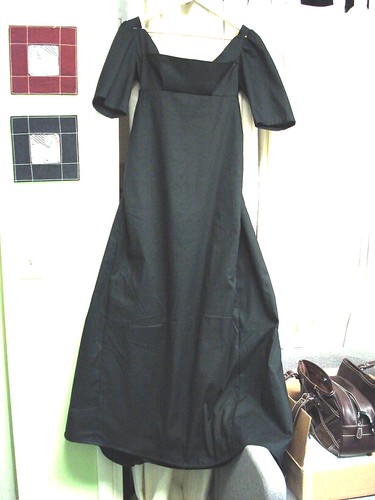  |
|


 Where so many hours have been spent in convincing myself that I am right, is there not some reason to fear I may be wrong? ~ Jane Austen