|
|
Post by cosmoblue on Jan 25, 2008 20:34:29 GMT -5
Anyone used the Period Costumes For the Stage & Screen by Jean Hunnisett, 1805 Bodice and Skirt?
|
|
|
|
Post by dawnluckham on Jan 28, 2008 11:10:03 GMT -5
I think I've used all of the Regency era patterns in the book, Cosmo. What is it you wanted to know?
|
|
|
|
Post by cosmoblue on Jan 29, 2008 13:12:31 GMT -5
I think I've used all of the Regency era patterns in the book, Cosmo. What is it you wanted to know? Well, I am just curious how this pattern worked for you? Did you have to add SA? Did it go together easily? How did you decide how to sew it together? Is that pattern piece F(the Front Bodice Trim) supposed to be cut on the fold? How did it fit? Do you have any pictures of this garment finished? What are those lower squiggley gather lines for on the pattern? Would it be terrible if I removed the train by just cutting it straight? |
|
|
|
Post by dawnluckham on Jan 30, 2008 23:11:57 GMT -5
I really like all the patterns in these books.  ALL the patterns... You do have to add seam allowance. Yes, they go together very easily. I usually either line the bodice or I use French seams. The 1805 dress is a "high stomacher" or Bib front gown. The piece F is the band for the bib. The bib itself will need to be gathered a bit at the top and the band must fit you across the top of the bib. As far as fit goes, I made one for my daughter years ago and it fit fine. I generally sew gowns to sell so I make it whatever size and people try them on and if they fit, they buy them so.... This is probably not my best question. I'm sorry, no pictures. The gowns are sold and gone. I haven't always been good about taking pictures of all of my work. I'm getting better at it... but still it's sometimes gone before I get 'round to taking photos. Lower squiggly lines? Do you mean on the skirt? Those show you how the fabric has been pleated. Yes, you can make it without the train. Though, instread of cutting straight across, I might add just a little dip in the back. |
|
|
|
Post by Mme de Beaufort on Jan 31, 2008 13:02:14 GMT -5
Dawn, I'm going to exhalt you. Your experience is so valuable. Thank you so much for joining the forum.
|
|
|
|
Post by dawnluckham on Jan 31, 2008 17:00:40 GMT -5
Awww! Thank you Steph. (I'm blushing!) It's fun to talk Regency clothes with others who are also enjoying the time period. This is my absolute favourite period in clothing history, though I've sewn other eras as well. I love sharing the enthusiasm of the people here. Thank you for your warm welcome. |
|
|
|
Post by cosmoblue on Feb 2, 2008 0:51:57 GMT -5
Dawn, I am trying to base my gown off of this pattern and I am having a bit of trouble because I cant seem to figure out how the skirt and bodice are supposed to fit together. What are the notches for? They don't seem to match up. I could "make it work" (I constantly hear Tim Gunn in my head) but I am curious how it is supposed to work.
|
|
|
|
Post by dawnluckham on Feb 2, 2008 9:01:07 GMT -5
Notches – where? There are notches on the bodice to match shoulder seams and side seams. There are notches to indicate the pleating on the back of the skirt. The long slash on the skirt pattern indicates where the front bib attaches to the CF section of the skirt. Then there is the slashed pattern section (which can be a seam if you like). The skirt is pleated and attached to the side/back bodice with close gathering at CB. Look at the picture on page 31. It shows how the bib is only attached to the skirt front. Without buttons or pins to hold the bib up over the bust, the front falls free at the skirt side seams. The skirt back is attached to the bodice back and sides. The shaded overlap area is not sewn to the skirt but raw edges are turned and finished. For more visuals, go back to Katherine’s Dress Site and look at the photos she’s posted of her Janet Arnold Drop front gown. www.koshka-the-cat.com/drop_front3.html |
|
|
|
Post by cosmoblue on Feb 2, 2008 12:28:39 GMT -5
There are two notches on the skirt one on either side of the slit.
The front of the skirt pattern is much wider than the front of the bodice pattern especially if I gather it. That is why I am confused.
I have been studying Katherine's gown all night and that is why I think I can make it work. I see that Katherine's gown's skirt extends beyond the front panel though the sketch on page 31 doesn't have that. The sketch on page 31 does have gathers on the skirt which the pattern doesn't show.
|
|
|
|
Post by dawnluckham on Feb 2, 2008 14:42:59 GMT -5
I would take those notches to be either a rolled hem or a seam allowance - nothing more. This slash will remain open and it needs to be hemmed.
After looking again at the pattern pieces, I think one thing has been left out. There is a narrow waistband/tie at the bottom of the bib that also attaches to the skirt. If you have access to either Janet Arnold's book or Nancy Bradfield's "Costume in Detail" (page 89, page 95) you'll be able to get a clear look at where the ties go and how they're supposed to work.
I like to have a tie at the centre back of the bodice at the gown's high waist. When the arms are put into the dress, and the bodice put on, these ties are wrapped to the front of the body and tied under the bust. Then the inner flaps are overlapped and pinned.
The bib front is sewn to the top centre of a long strip (which are your front ties – It needs to be long enough to at least tie at your back, but often it crosses over at centre back and is wrapped back to the front, being tied under the bust on either the inside or the outside of the gown. (Katherine ties it on the inside, I think, so that all ties are hidden.)
The skirt is sewn to the bottom centre of the long strip. - And you’re right; it can extend an inch or two beyond the width of the bib.
|
|
|
|
Post by cosmoblue on Feb 2, 2008 15:10:28 GMT -5
Boy is that tricky. Well, Thanks. It is going to be a super adventure that probably won't end up being super accurate, but I'm sure it will turn out fine.
|
|
|
|
Post by dawnluckham on Feb 3, 2008 9:50:58 GMT -5
Here's another image that may help. It's a flat image of a bib front gown for sale at "Trousseau". See how the front is attached to the bib and the skirt back is attached to the bodice back but the cross over flaps (made of a different - less fancy fabric) are not attached to the skirt. The sides are left open to a few inches above the knee where they are seamed to hem. www.trousseau.net/trousseau2.asp?P=3&IEN=4711Here's the main page for this dress, so you can see the waistband better. Click on the images to enlarge them. www.trousseau.net/trousseau2.asp?P=2&I=990 |
|
|
|
Post by Val on Feb 3, 2008 23:14:24 GMT -5
Dawn, thank you for posting this website. It looks really nice, and I've marked it to look thru it further.
|
|
|
|
Post by cosmoblue on Feb 10, 2008 20:38:39 GMT -5
Recommended with CautionNot Recommended For BeginnersWell, I am not sure if I can recommend this pattern for just anyone, but It worked out pretty well. I used the 1805 Skirt and Skirt with the full sleeve patten. I think that I am fairly pleased with the outcome seeing as in this photo it is only about 1/2 completed (I could have used another 2 hours just to press it properly). In general it creates a beautiful shape. The biggest problem for me was that the pieces didn't quite fit together and I had to true and balance a lot of the bodice pieces. It was challenging because there are not step by step instructions either so I have to make it up as I was going based on the images on Katherine's Dress Site and Dawn's tips. The front of the gown I made is not the one in the book since I was working from a portrait. I was lucky to be very close to the scaled up size and I only had to increase the width of the front by a few inches. I also added the runners on the back to hold the ties in place. What I did: I made the gown from 100% polyester taffeta (please don't flame me I know it isn't period, but I'm vegan and won't do silk). I lined the bodice with 100% cotton muslin. I added a few inches to the front pieces at the CF. I cut the back and front pieces on the bias. I made the shoulder pieces narrower. I added runners on the back for the ties. I draped the sleeve to match a painting. Things I noticed: 1. I wished that the book had more pictures 2. I wished that the book had step by step construction instructions. 3. The train on the skirt is insane I reduced it by about 8" and I still tripped on it a couple of times while dancing. 4. Hand sewing was required to make this look halfway decent even though I usually try to avoid doing it. This is what I came up with (remember this is not finished there should be trims on it): 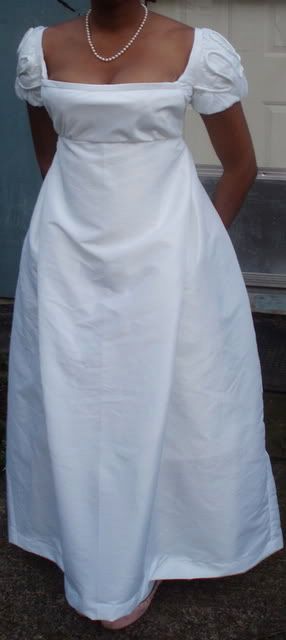 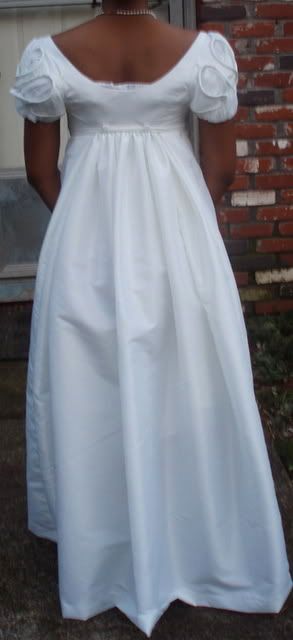 ETA: after looking at so many pictures of myself in the gown and comparing it to the portrait that I was using I wish that the front of the bodice were shorter. I would like to have made the waist about 1"-2" higher in the front.
|
|
|
|
Post by Val on Feb 10, 2008 21:49:32 GMT -5
I made the gown from 100% polyester taffeta (please don't flame me I know it isn't period, but I'm vegan and won't do silk). Hey, I have some gorgeous purple poly taffeta I'm dying to make *something* with! And I have a couple other poly-taffs too. Nothing wrong with that. You can get more bang for your buck w/o using the expensive stuff. I actually prefer 100% cotton whenever I can use it, because it gets so hot out here in the eastern portion of So Calif. |
|
|
|
Post by dawnluckham on Feb 10, 2008 22:59:33 GMT -5
I can't wait to see the "finished" gown. This looks positively lovely!
|
|
|
|
Post by cosmoblue on Feb 12, 2008 0:57:06 GMT -5
ETA: after looking at so many pictures of myself in the gown and comparing it to the portrait that I was using I wish that the front of the bodice were shorter. I would like to have made the waist about 1"-2" higher in the front.
|
|


 Where so many hours have been spent in convincing myself that I am right, is there not some reason to fear I may be wrong? ~ Jane Austen