|
|
Post by Mme de Beaufort on Oct 15, 2007 18:11:28 GMT -5
|
|
|
|
Post by cosmoblue on Oct 19, 2007 3:01:09 GMT -5
I found this review here: www.gbacg.org/GreatPatternReview/MantuaMaker.htm#1810-3 - Regency Corset 1800-1820
Katherine Caron-Greig - RecommendedThe corset was very simple to make. I had read that the pattern ran small, so I added about 2" to each center back piece. This worked fine since the front piece fit nicely. It's amazing how much better a Regency dress looks with the corset (and the smooth line it gives) underneath. I would recommend using a slightly flexible busk though, mine is very stiff and I can't lace the corset tightly enough when it's in, which causes the corset to ride up which is rather uncomfortable. The corset still works without the busk though, and is extremely comfortable. Pictured on the left. Monique Motyl - RecommendedIt is a good corset pattern but, it is tricky. You must make a muslin first because you'll probably need to make adjustments in the gussets. The Regency corset is very long; if you have large hips, you'll want to add hip gussets at each side. Regency corsets were quilted but, there are no instructions for quilting. This is a significant omission. A friend did the research for me in books and on the Internet to find examples. She found a few and we used those to created the quilted panels. It is an extremely comfortable corset. If you're a large size and have felt the Regency line is not flattering to you, this corset will change your mind. In creating the proper silhouette and shaping the body, it is extremely flattering. Pictured on the right. Alessandra Kelley - Recommended with a caveat. This is a useful pattern. The instructions are clear, well-illustrated, and good-humored. The pattern pieces fit together perfectly. Unfortunately, the pattern seems to run small. Size 10, which is supposed to fit a 37" bust with 1" to 4" of spring (i.e. the lacing gap) at the back, produces a garment only 29" wide at the bust line. It works, but one a tad larger might have been an improvement. Apart from that this is a very user-friendly pattern. |
|
|
|
Post by cosmoblue on Dec 19, 2007 19:07:06 GMT -5
What should I make the Manuta Maker Stays from? Should I use Coutil for all of the layers or just some of them? How do you choose what amount boning to use? How do you decide which of the many options of this corset to use? There are like a million options.
|
|
|
|
Post by dawnluckham on Dec 20, 2007 10:13:25 GMT -5
For your first set of stays, make them from at least one layer of coutil. Make the simple option. Make a muslin mock-up before you cut into your expensive fabric. Use cheap fabric store boning for the mock-up. You can take this boning out later to measure it so you can order tipped boning lengths.
|
|
|
|
Post by cosmoblue on Dec 20, 2007 13:57:12 GMT -5
dawnluckham - Do you think that coutil as the lining and interlining with cotton sateen for the cover fabric is a good simplest option?
|
|
|
|
Post by dawnluckham on Dec 20, 2007 18:18:19 GMT -5
Regency Period stays were often made of linen, not coutil. Coutil is a fabric that has come into common use for corsetry sometime mid century. Having said that “ticking” has been fairly common for making stays throughout the 19th century. What’s the difference between “ticking” and “coutil”? I’m not entirely sure.
Having said that, my own preference for corset making is to use as few layers as possible.
Extent garments I have looked at have been single, double and triple layers.
Sometimes the actual design/construction of the stays requires that you need to use two layers. The ONLY time I, personally, would use three layers (although I’m aware that patterns tell you to interline) is if I used an outer fashion fabric that needed the support of an interlining. Or if I didn’t want the boning channels to show on the outer layer.
If you decide to cord your corset, you need two layers. If you want to use coutil as the lining and a more period fabric like linen for the outer layer, that will work very well.
If you want just the coutil as a single layer set of stays, using spring steel and spiral steel boning, you can use boning tape to create the boning channels.
If you’ve decided to use a fashion fabric that will probably not be strong enough and if you think that the boning will work it’s way though the boning channels, then by all means, interline.
The only period stays I’ve seen made out of 3 layers, all three layers were fairly lightweight fabric (something like quilting cotton weight). So, you need to be careful with too many layers and overly stiff fabrics. Two layers of coutil makes quite a stiff corset.
|
|
|
|
Post by cosmoblue on Dec 20, 2007 19:40:47 GMT -5
I can see that this is going to be fun using trial and error until I decide what I like. I had better look at some more photos of some stays to find out which look I like. I think that I will be happiest when I decide to start on corded stays.
|
|
|
|
Post by cosmoblue on Jan 31, 2008 12:11:38 GMT -5
I had to email Deb for instructions on How to finish the CB of the Stays. This is Her Reply: Woops! Busted! How embarrassing. Finishing the back edge is nowhere in the instructions at all! I pulled out my corset, and I bound the back edge. So you have 3 options: 1) Bind the edge; 2) Fold the back edges under by 1/4" to 1/2" (as little as your machine will let you get away with) and stitch as close to the edge as you can (this is in imitation of the next option). 3) Fold the back edges under by 1/4" and tightly hem or slip-stitch the edges together by hand. The third option is probably the most historically accurate, and definitely the most time consuming unless you are good at hand sewing. The first option was used (I've seen it on a slightly later corset), but of course the second wasn't - the sewing machine wasn't invented yet. I hope this helps! Happy sewing, Deb Salisbury The Mantua-Maker 100 PR 232 Abbott, TX 76621 www.mantua-maker.com |
|
|
|
Post by cosmoblue on Feb 10, 2008 19:48:26 GMT -5
ReccommendedThis pattern was extremely easy to use. All of the pieces fit together beautifully and the directions were fairly clear with two exceptions. 1 being the question of the back finishing and that question was answered quickly by Deb (I helped posted the answer earlier). 2 being how to finish the busk pocket with binding I did not take the time to email Deb about it because I was in such a rush so I just bound the bottom from the center back up to the busk pocket stitch line where I had already bound in the earlier step. Also one little thing is that the list of notions doesn't say what size binding to use and the finished width is 1/2". I ended up having to remake the bias because I overlooked that in the directions when I was reading though them before I started. What I did: I made my stays of three layers two of a light weight peached cotton canvas for the lining and interlining and one of a magnificent cotton sateen. I used 1/4" spiral bones at the seams and inside center back (total 6) and 1/4" spring steel bones for the center back edges. I used a paint stick as the busk. Metal eyelets, corset lace, and 1/4" grosgrain ribbon for the strap laces. I altered the pattern to accommodate my hips adding 1" to each of the hip gussets according to the directions given in the pattern. Things I noticed: 1. When I made the toile I made it in a muslin and it fit really well, but when I made it in the three layers It was much less stretchy and so it didn't close as closely in the back. I should have used a more tightly woven fabric to make my toile. 2. I don't think I really needed all three layers, at least not with how heavy my fabrics were. The stays are really heavy though luckily for me they are all cotton so breathe really well so I didn't get too hot while wearing them. 3. Being as curvy as I am I probably should have altered the pattern a bit more to accommodate my voluptuousness. I would like for the back edges to me more parallel. 4. The finished product was totally reasonable to wear and dance in though not so great for riding in the car. It is weird that you cant bend or turn from the waist so my neck got quite a workout. Okay, So here is my finished Mantua Maker Stays 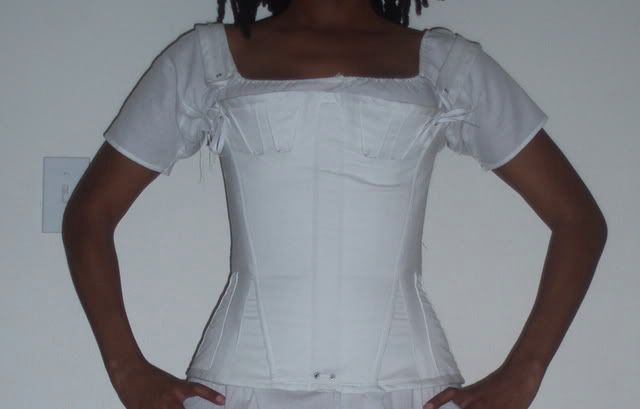 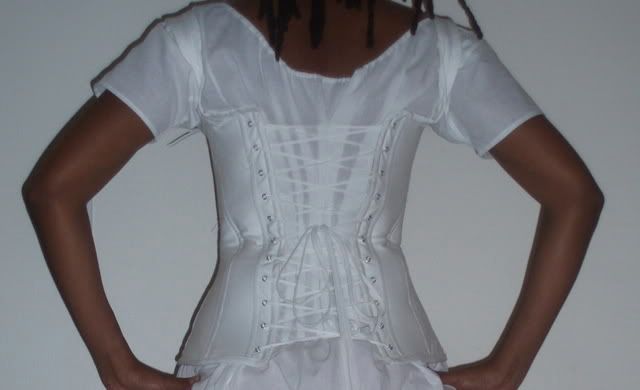 and here it is after 6 hours of wear. 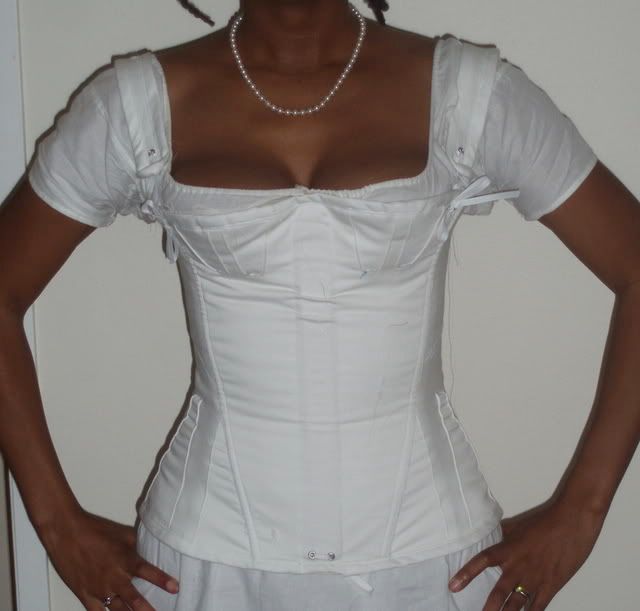  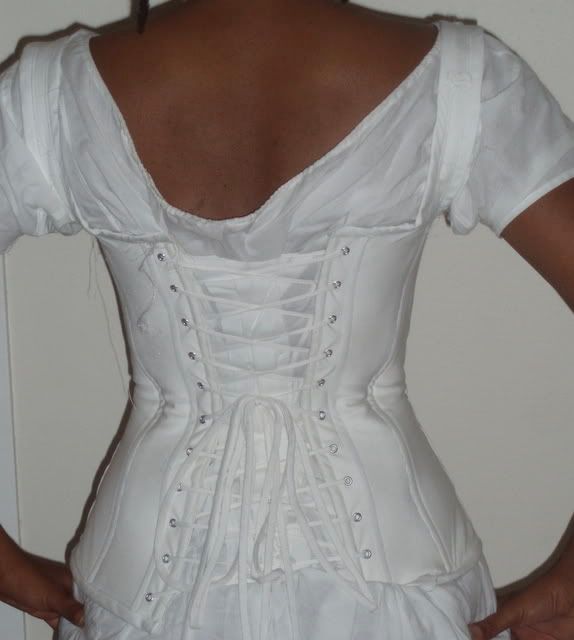 Here is my toile: 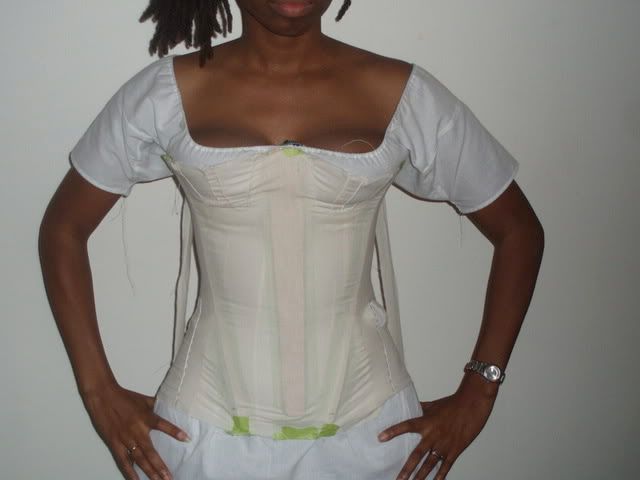 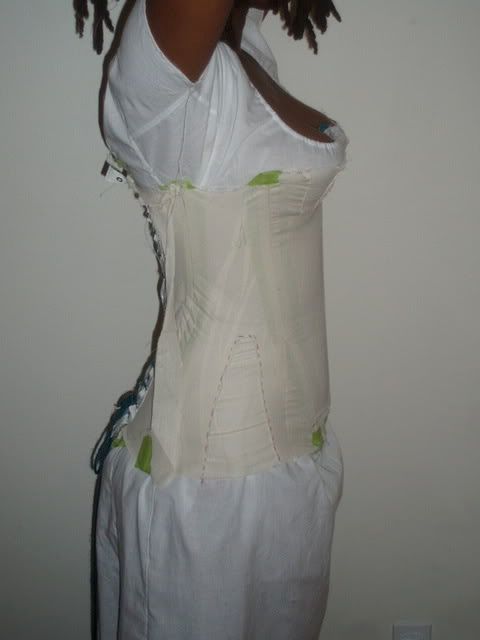 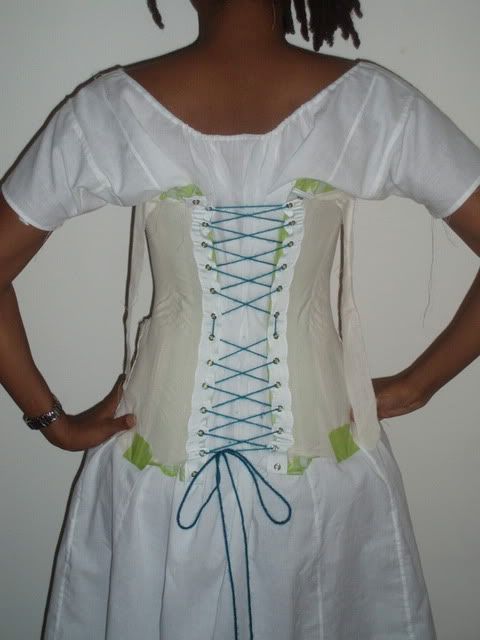
|
|
|
|
Post by Val on Feb 10, 2008 21:54:11 GMT -5
Just a suggestion on the lacing: Regency is more about a straight line than having a cinched in waist, which is more Victorian style. Dawn may be able to clarify this more than me.
|
|
|
|
Post by dawnluckham on Feb 10, 2008 22:53:41 GMT -5
They held up really well after 6 hours of wear, Cosmo. All ‘parts’ appear to have remained in place ;D
You're right, of course, Val. But what I think you see here is the lacing "settling" after she's been dancing all night. As these stays were being constructed, I mentioned to Cosmo on one of the other threads, that she could add a bit more to the hip gusset and a bit more to the side panel to back panel seam above the waist in order to make an even lacing gap. She mentions in her review that she would make more modifications to better fit her curves.
The other thing you see here is the result of a Victorian style of lacing, which makes it MUCH easier to get dressed by yourself. The period spiral lacing up the back makes it all but impossible to dress alone. With the Victorian lacing, because you're tightening the laces from the waist, it's easy to cinch the waist if you don't even out the laces from the bottom of the stays and the top of the stays and work the excess toward the waist.
Cosmo says she danced all night and the photo shows the stays after 6 hours of wear. I'd say the lacing loosened itself in the hip area and in the upper back (Stays definitely loosen with long wear. I've had to retighten myself after a few hours!) As the lacing loosened, the tightness settled at her waist, which probably has the most ‘give’.
|
|
|
|
Post by Mme de Beaufort on Feb 10, 2008 22:59:05 GMT -5
The performance of Cosmo's stays was enough to sell me on that pattern, I was infinitely jealous of 1) how gorgeous her girls looked, and 2) how nicely the stayed in place and how separate they were. I'm now resolved to throw aside my latest stay and start a new one complete with busk.
She did a fabulous job, and for her first historic costume, I think she's really gone far above and beyond what anyone else could hope to accomplish. She made some ambitious choices and pulled them off. I am truly impressed.
I intend to solicit her assistance in making a stay that will work for me.
|
|
|
|
Post by cosmoblue on Feb 11, 2008 4:17:32 GMT -5
You're right, of course, Val. But what I think you see here is the lacing "settling" after she's been dancing all night. As these stays were being constructed, I mentioned to Cosmo on one of the other threads, that she could add a bit more to the hip gusset and a bit more to the side panel to back panel seam above the waist in order to make an even lacing gap. She mentions in her review that she would make more modifications to better fit her curves. Yep, no cinching on purpose. My measurements are 36,27,40. That is as straight as I get. |
|
|
|
Post by cosmoblue on Feb 11, 2008 4:21:03 GMT -5
They held up really well after 6 hours of wear, Cosmo. All ‘parts’ appear to have remained in place ;D The other thing you see here is the result of a Victorian style of lacing, which makes it MUCH easier to get dressed by yourself. The period spiral lacing up the back makes it all but impossible to dress alone. With the Victorian lacing, because you're tightening the laces from the waist, it's easy to cinch the waist if you don't even out the laces from the bottom of the stays and the top of the stays and work the excess toward the waist. Cosmo says she danced all night and the photo shows the stays after 6 hours of wear. I'd say the lacing loosened itself in the hip area and in the upper back (Stays definitely loosen with long wear. I've had to retighten myself after a few hours!) As the lacing loosened, the tightness settled at her waist, which probably has the most ‘give’. Thanks Dawn. I had no idea about the loosening. I was so confused because when my hubby had laced me up before I left they were so beautifully laced, but when I got home all wonky they were.  |
|
|
|
Post by Val on Apr 27, 2008 23:12:50 GMT -5
Cosmo, or Dawn, I'm working on finishing my stays now, and I was just wondering how you finished the top of the pocket where the busk goes. I don't have a pattern or directions to follow with mine. I'm assuming it's left open so the busk can be taken out but did you just turn the edges under? Or?
|
|
|
|
Post by cosmoblue on Apr 28, 2008 0:33:12 GMT -5
Cosmo, or Dawn, I'm working on finishing my stays now, and I was just wondering how you finished the top of the pocket where the busk goes. I don't have a pattern or directions to follow with mine. I'm assuming it's left open so the busk can be taken out but did you just turn the edges under? Or? As you can see in the photos the busk pocket on my Mantua Maker opens at the bottom. It has 2 pieces of bias one on the self and one on the lining. Then the bias was applied to both sides of the opening. |
|
|
|
Post by dawnluckham on Apr 28, 2008 6:18:16 GMT -5
For my long stays (that were from the Period Costume for Stage and Screen book) I also had a busk pocket but I finished it a little differently. I bound the edges of my stays “normally” and I made a slashed opening like a button hole just below the binding on the inside layer of the pocket. (It was finished with a button hole stitch and for all purposes it was a really wide buttonhole  – Wide enough for the busk to slide through.) Below the buttonhole was a collection of eyelets: Two on the inside of the pocket layer and two on the outside of the pocket layer. When you run a ribbon through the eyelets and tie it, this prevents the busk from sliding out of the pocket. I noticed on Cosmo’s stays that she has the eyelets at the bottom of her stays and I have mine at the top of my stays. |
|
|
|
Post by Val on Apr 28, 2008 10:56:29 GMT -5
I was going to ask, does it matter if the busk is removeable at the top or bottom? I can see if the opening is at the bottom, you would need to be sure it doesn't slide down. But also at the top, since things get pushed up, you obviously don't want this "thing" to start popping out the top.
I was thinking of making the opening at the top, because apparently when we started these in class, they had us do a little cut on either side of the pocket on the lining to turn it under separately. But now that I'm getting close to doing this, that doesn't make sense to me, just because I know things get shoved up.
I'll go see if I can find Cosmos pictures of her's.
*Edited to add: Cosmo, I'm sorry, I seem to be asking questions in the Pattern Review section again. I just went looking for anything to do with the corset and found this one.
|
|
|
|
Post by Mme de Beaufort on Jul 29, 2008 12:14:30 GMT -5
I got mine in the mail today. :::YAY:: I'll start it after the Midsummer NIght's Dream Masquerade.
|
|
|
|
Post by dawnluckham on Jul 29, 2008 21:30:10 GMT -5
Have fun making it!
|
|


 Where so many hours have been spent in convincing myself that I am right, is there not some reason to fear I may be wrong? ~ Jane Austen