|
|
Post by Anna on Jul 29, 2008 13:35:39 GMT -5
I've been working on the Mantua Maker stays in the past few days. I'll do a proper write-up when I'm done, but if you like costume diaries, I've been keeping track of the project here: community.livejournal.com/oldsewing/ |
|
|
|
Post by cosmoblue on Jul 29, 2008 14:34:18 GMT -5
I just read the about your stays and I wanted to say that I didn't think that there was any difficulty with the gussets in the Mantua Maker stays.
My copy of the directions says "the edge of the gusset should fall 1/8" inside the turned edge" Which only is 1/4" SA on the gusset piece. I personally only used an 1/8" because I am a DDD and I ddin't need any more SA.
|
|
|
|
Post by cosmoblue on Jul 29, 2008 14:48:33 GMT -5
I also wanted to add that I added 1" to my gussets to accommodate my hips. I think it is interesting how differently people can interpret the same directions. When I first did the gussets I only did 1/8" then I changed it to 1/4" and then I changed it back to 1/8". The part I had trouble with was the bias. I didn't have wide enough bias.
|
|
|
|
Post by Anna on Jul 30, 2008 16:23:00 GMT -5
Oh, I may have been reading the directions backwards. I didn't see anywhere that the seam allowance on the gussets was 1/4", but if that's the case it would make a lot more sense. Thanks!
|
|
|
|
Post by Mme de Beaufort on Oct 13, 2008 10:08:03 GMT -5
I've started my mantua maker stays... and all i have to say is I'm in GUSSET-HELL!~!
::urgh::
I'll post pics when I get something significant accomplished. Right now I'm the gusset slave.
|
|
|
|
Post by dawnluckham on Oct 13, 2008 13:44:48 GMT -5
Steph, I don’t know how they tell you to do the gussets in the pattern ( and let’s face it, I’m too lazy to go upstairs to dig the pattern out to use as a reference), but here’s how I sew gussets. Over the years I’ve learned to simplify the process hugely.
I plan for ¼ inch seam allowance on both the slashed opening and the gusset. (I know other patterns will suggest you do it differently but I’ve found this just complicates things.)
On the slash I sometimes press the seam allowance to the inside so I can use the pressed crease as a guideline.
For both sides of the gusset, I always start from the top of the gusset and stitch down to the bottom of the “v”.
I sew both sides, leaving the bottom of the slash OPEN. I don’t try to do the bottom with my machine any more.
I hand finish the bottom with a nice whip stitch and then go over it again to make an embroidered scallop (using a buttonhole stitch), which shows on the outside. I use embroidery thread to finish the base of the slash. This hand-work takes only minutes to do and saves the frustration of fighting with the machine to make a tidy looking finish at the base of the slash. This is also a very ‘period correct’ finish.
If you are making a single layer corset/stays and if you wish to trim the inner seam allowance and fold the outer over to fell the finished gusset sides, this can be done now. The ¼ inch seam allowance leaves enough to make a narrow felled seam.
If your corset/stays are going to be two layers, I prefer to make single layer gussets but to hand whip stitch the lining to the gusset seam allowance. (In this case, you don’t need to fell the seam allowances.)
An alternate way to make the gussets of a single layer stays look tidy on the inside is to place a piece of ribbon over the raw seam allowance. I use a glue stick and my iron to “baste” the ribbon where I want it. Then on the front side of the stays I machine embroider down the outsides of the gussets. This makes for a very pretty finish on the outside and the ribbon covers all messy seam allowances on the inside.
I don’t know if any of this will help you, but it’s worth trying my suggestions on a little scrap. If it works well for you, I think I’d toss out the instructions on the pattern for the gusset sections.
Wishing you luck with it!
|
|
|
|
Post by Anna on Oct 13, 2008 13:47:57 GMT -5
What I did was:
On the bust gussets - slash, iron, and pin back the edge using perpendicular pins (two to a side, or so) and then lay the gusset on top and pin it down with parallel pins (parallel and perpendicular to the seam). Then I top stitched around on the front side, so I could see where the corners were. I always had the gusset seam allowances larger than the fronts seam allowances (I think? It's been a while since I worked on these - will check when I get home). I suppose that means I was doing it wrong, but it was what worked out.
On the hip gussets - I used the provided gusset for the in-seam one, and drafted a new one for the slash. I think I just made it a few fractions of an inch wider along the whole side. That made enough space that the gusset set in the same way the bust gussets did.
I'll see if I can get any more useful information out of them when I get home. They're half-finished, sitting on top of the bookshelf in the living room.
|
|
|
|
Post by Mme de Beaufort on Oct 14, 2008 10:20:28 GMT -5
Hey Dawn. That's generally how I do them too. I just don't necessarily enjoy doing them is what I was saying. This is the little guide I made a while back: 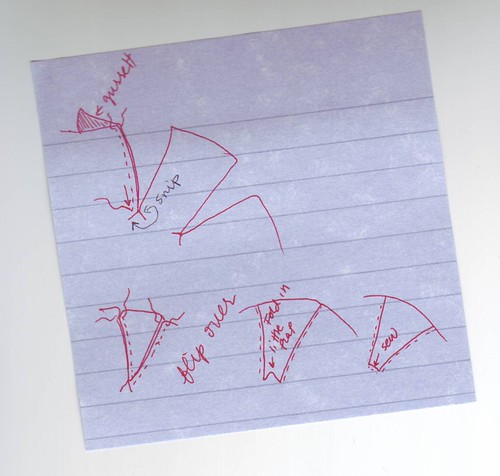 |
|
|
|
Post by Val on Oct 14, 2008 11:12:45 GMT -5
Dawn, thank you for posting this. I've printed it out for my technical library for the future. I remember being in "gusset hell" also.
|
|
|
|
Post by Val on Oct 14, 2008 11:14:10 GMT -5
Anna, thank you also for adding your bit of expertise. Every little bit helps us.
|
|
|
|
Post by Anna on Oct 14, 2008 15:14:27 GMT -5
Right, so - For the in-seam hip gusset, I was very careful to not sew down any of the seam allowances. So if you look at the back side , in the gusset the seams go to a neat V. On the front and side, the seam goes straight up, but if you looked closer you'd see that it was stitched in two parts. I can try to remember to get a picture, if that didn't help.
On the inset hip gusset, I knew I needed more space anyway, so I just added that much to one entire side (not slimming it out anywhere). That gave me enough space at the top that I could do the rectangular finish like for the bust gussets.
My method does leave machine stitching showing all around the gussets, but I was so tired of fighting them and it looked so much nicer that way that I don't care.
|
|


 Where so many hours have been spent in convincing myself that I am right, is there not some reason to fear I may be wrong? ~ Jane Austen